Here are some tips on what you can do to your
MR4TC to improve its performance:
Tosolini
Type Rear Suspension
Cut down the rear hubs to 30 mm and
drill a hole for the ballstud. This will generate more grip. You can use
all the holes in the two upper rows of the shocktower. Most grip with the
link in the inner upper hole (link as long as possible).
You can further adjust the rollcenter
by putting spacers under the ballstud.

King pin
ballend
Front suspension modification used
by Chris Tosolini (see setups)
Parts needed:
King pin ballstud - part #
ZR-007F
Long Losi ballends
Caster block - part # ZM-413
(if you cut the original link mounting horns )

12x6 ball
bearings for the wheel axle
Smoother and
much longer life when using 12x6 wheel axle bearings compared to the original
10x6 bearings.
Parts needed:
Front steering
blocks - part# ZM-415SH
Front ballbearings
- part# BB-126N-4
Rear hubs
- part# ZS-415RH0 (0 deg toe), ZS-415RH1 (1 deg toe), ZS-415RH2 (2 deg
toe)
Rear ballbearings
- part# BB-126-4
MR4TC Special
tips:
Under some conditions the new MR4TCSP
chassis has been found to be a bit over responsive, twitchy, when using
the same setups as on the older car. To get rid of this, and make the car
easier to drive, change these things from the standard setup:
- use 2 deg rear hubs
- use green rear springs
- use no rear roll bar
For Masami's latest standard setup
go here.
Tip #1
-
Cut the top deck so that it can flex.
Obviously Yokomo now have the Worlds spec top deck available, but you can
also make your own out of the original one with a bit of dremeling. The
Worlds spec one also do not have as much cut out as the factory drivers
usually run so you can cut away a bit more from that also. One thing you
should remember is that you should NOT countersink the top deck since that
can twist the chassis which will cause problems.
Tip
#2
-
Turn your servo 90 degrees to make the
steering is symmetrical. This will help to allow the chassis to flex more
evenly.
With
these changes you will gain steering and rear traction,
as well
as making the car more consistent to drive.
(Personally
i like my car with these mods, but I'm not sure they will work
so
well at really high-grip conditions, i.e. on carpet with foam tires)
I only
recommend experienced drivers to try the above mods.
Tip #3
-
The standard plastic A-arms will also
make the car feel more consistent compared to the graphite ones and give
the car a bit more steering.
Tip
#4
-
You can also remove the middle post
(where the battery bar goes) when you cut the upper deck; this will also
allow more flex. If you do this you can use tape to fasten the battery.
Or, you can make your own battery holder out of the TC3 battery bar plus
two aluminum posts. This system will also hold your packs more securely
than the original battery bar. (This tip is not for the MR4TCSP)
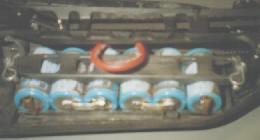
click the image for a bigger picture
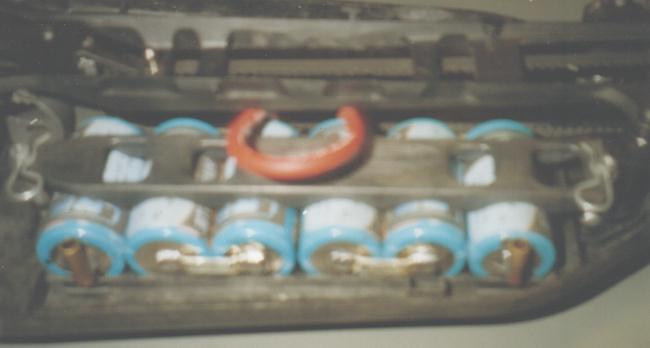
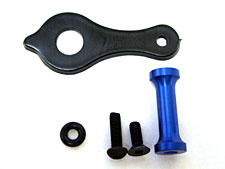
Tip #5
Mount the rear
link to the bulkhead by using ~22mm screws.
Place a small
diameter shim on the screw and thread it through
the ball (at
the inner end of the rear link) and then thread it
through the
bulkhead where the shorter screw went before.
(See the pictures
to understand what I mean)
This will
give you a more stable and secure rear end,
in other words
more rear grip.
Mount the
link to the front of the rear hub.
Here are some
tips on building the differentials on your MR4TC:
-
Use black grease on the head of the
diff screw before you place the thrustwasher over it.
-
Apply enough black grease on the thrust
bearing assembly.
-
Hold the diff vertically while you build
it (one outdrive facing upwards and the other downwards)
-
Tighten the diff screw a little, the
spin the outdrives, then tighten etc.
-
Dont set your diff too tightly, just
tight enough so that it wont slip.
Transponder
mount
There are a
few different ways to mount the transponder on your MR4TC. Here we show
you the most common ways.
1. The most obvious way is to use the newYokomo transponder mount,
part#: ZS-TPH
2. For this you need the Kyosho part SP-106. This is actually a "battery
holder set" for the
Kyosho TF4R car, but the transponder mount is also included. You can mount
this in a few
ways, but you will need to drill a hole in the chassis and countersink
it.
3. You can also mount the transponder on the right side of the chassis,
behind the batteries.
The easiest way here is to make a small transponder mount out of lexan.
Here shown on Davis
Spashetts Euros winning car.

1.
2.
3.
Yokomo Spring List
TC springs (g/3mm)
YS-1360 Black (519g)
YS-1355 Blue (561g)
YS-1465 White (591g)
YS-1460 Hot Yellow (690g)
YS-14575 Hot Pink (703g)
YS-1455 Hot Green (738g)
YS-14525 Stainress (692g) (different
material)
YS-1450 Hot Orange (949g)
GT4 springs
YS-1560 Dark Green (870g)
YS-1660 Red (982g)
YS-1655 Yellow (1210g)
YS-1650 Green (1335g)
YS-1760 Silver (1389g)
YS-1755 Gray (1416g)
YS-1750 Brown (1722g)
All of these springs can be
used on both the MR4TC and GT4.
Spring comparison chart:
AE
TC3 -> <- Yokomo
Copper 25 lbs. ->
Red 22 lbs. ->
<- Orange
Gold 19.5 lbs. ->
Blue 17 lbs. ->
<- Green
Silver 14.5 lbs. ->
Green 12 lbs. -> <- Yellow